How to Add Class Information to a Class Name
Note: the creating, viewing, updating or deleting of class information within My Recipe Manager requires the 'Class Names' (role) to be assigned to the users account by a school administrator. To view the list of available roles and what they allow a user to do click here.
Class information can be added to a class name in one of three ways. To view this information please select the applicable option below.
To assign information to a class name at the time of creating the class name follow the below instructions:
-
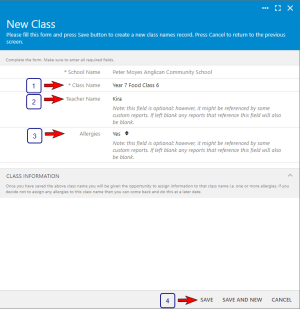
Ensure that you have entered a class name, the teachers name and selected 'Yes' for Allergies (refer to the below image) then select the 'Save' button.
To view the above image select it with your mouse pointer. To close the image either click the image for a second time or click outside the image. -
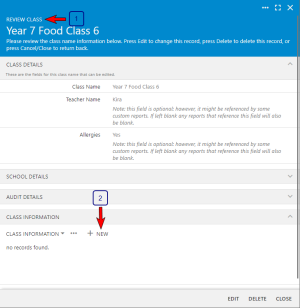
The 'Review Class' window will open. Select the 'New' button under the 'Class Information' heading (refer to the below image). If you change your mind or want to do this at a later date select the 'Close' button.
To view the above image select it with your mouse pointer. To close the image either click the image for a second time or click outside the image. -
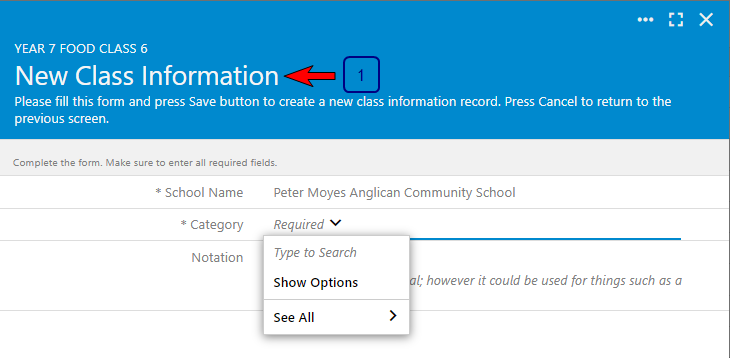
The 'New Class Information' window will open.
-
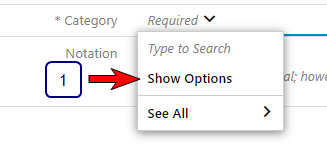
Select the 'Show Options' menu
-
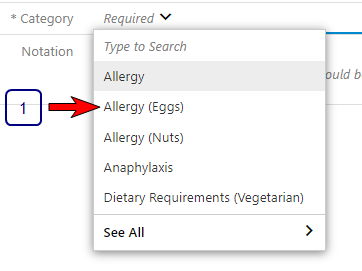
Select the category that you wish to assign to the class name
-
Optional: if you wish to enter a notation for the category you are assigning then enter a notation (or leave it blank) then select the 'Save' button. If you wish to add additional categories to the class name select the 'Save and New' button and repeats steps 4 and 5 above. Once you have entered your last category name select the 'Save' button instead of the 'Save and New' button.

-
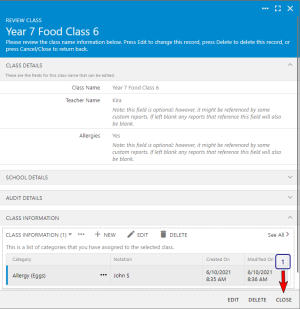
After selecting the 'Save' button above you will be returned to the 'Review Class' window where you will see the categories of information that you assigned to the class name (refer to below image). If you have finished adding class information to the class name you can now select the 'Close' button. If you haven’t finished you can also add additional categories, edit the listed categories or delete the listed categories by selecting the applicable buttons under the 'Class Information' heading.
-
After selecting the 'Close' button you will be returned to your list of class names. If you select the class name that you just created you will see the class information that you assigned to it (refer to the below image).
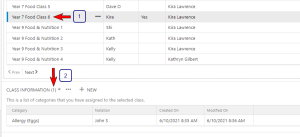
To view the above image select it with your mouse pointer. To close the image either click the image for a second time or click outside the image.
You can add class information to an existing class name in one of two ways
-
Select the 'Class Names' menu to display your list of class names
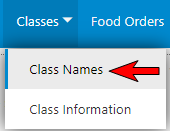
-
Locate the class name that you wish to assign additional information to and select it with your mouse pointer. If correctly selected you will see a small vertical coloured bar to the immediate left of the class name and the class name row will be slightly greyed out (refer to the below image). Any existing class information will be listed under the 'Class Information' heading under your list of class names. In the below example there are none so it displays the words 'no records found'.

-
Select the 'New' button

-
The 'New Class Information' window will open.

-
Select the 'Show Options' menu

-
Select the category that you wish to assign to the class name
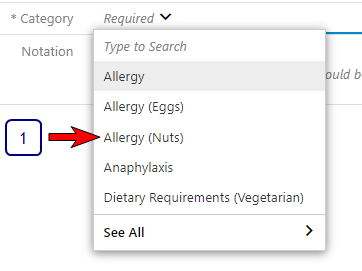
-
Optional: if you wish to enter a notation for the category you are assigning then enter a notation (or leave it blank) then select the 'Save' button. If you wish to add additional categories to the class name select the 'Save and New' button and repeats steps 5 and 6 above. Once you have entered your last category name select the 'Save' button instead of the 'Save and New' button.
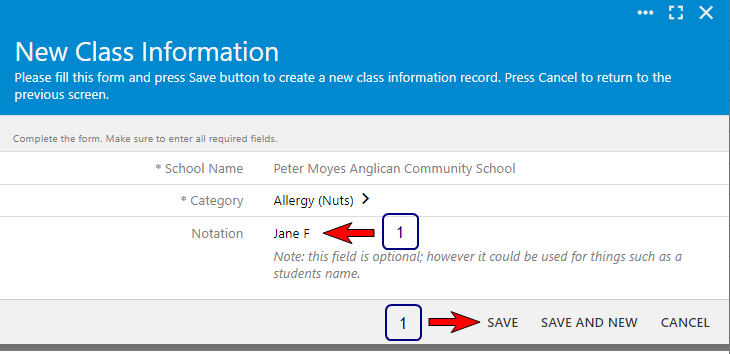
-
After selecting the 'Save' button you will be returned to your list of class names. If you select the class name that you previously selected you will see the class information that you just assigned to it (refer to the below image).

-
Select the 'Class Names' menu to display your list of class names

-
Locate the class name that you wish to assign additional information to and select its three dot ellipse (...) with your mouse pointer then select the 'Select' menu (refer to the below image).

-
This will open the 'Review Class' window (refer to the below image).
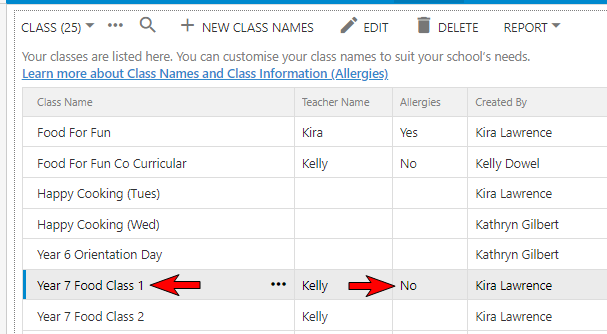
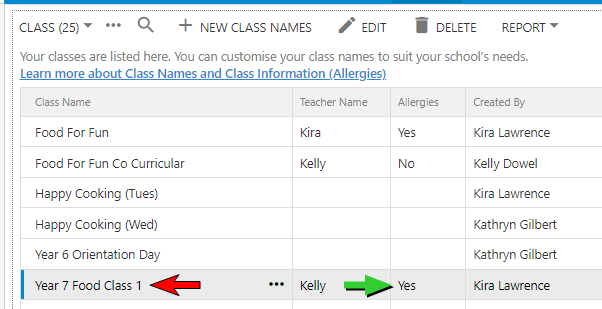
Before you add any class information ensure that 'Yes' has been selected for 'Allergies'. If it isn't then select the 'Edit' button, select 'Yes' for Allergies then select the 'Save' button. Doing this will also return you to your list of class names so re-select the class name by following point 2 above.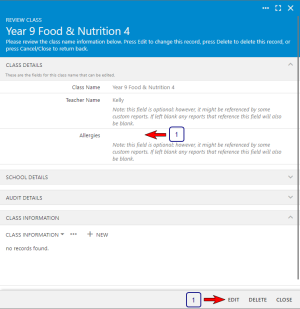
-
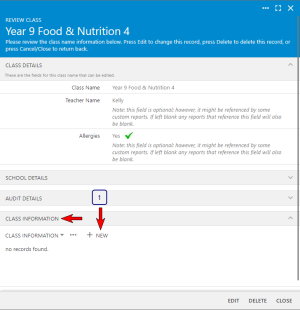
If 'Yes' has been recorded for 'Allergies' (refer to the below image) you can continue by selecting the 'New' button under the heading 'Class Information'
-
The 'New Class Information' window will open.

-
Select the 'Show Options' menu

-
Select the category that you wish to assign to the class name

-
Optional: if you wish to enter a notation for the category you are assigning then enter a notation (or leave it blank) then select the 'Save' button. If you wish to add additional categories to the class name select the 'Save and New' button and repeats steps 5 and 6 above. Once you have entered your last category name select the 'Save' button instead of the 'Save and New' button.

-
 Option 1 (At the Time of Creating a New Class Name)
To assign information to a class name at the time of creating the class name follow the below instructions:
-
Ensure that you have entered a class name, the teachers name and selected 'Yes' for Allergies (refer to the below image) then select the 'Save' button.

To view the above image select it with your mouse pointer. To close the image either click the image for a second time or click outside the image. -
The 'Review Class' window will open. Select the 'New' button under the 'Class Information' heading (refer to the below image). If you change your mind or want to do this at a later date select the 'Close' button.

To view the above image select it with your mouse pointer. To close the image either click the image for a second time or click outside the image. -
The 'New Class Information' window will open.

-
Select the 'Show Options' menu

-
Select the category that you wish to assign to the class name

-
Optional: if you wish to enter a notation for the category you are assigning then enter a notation (or leave it blank) then select the 'Save' button. If you wish to add additional categories to the class name select the 'Save and New' button and repeats steps 4 and 5 above. Once you have entered your last category name select the 'Save' button instead of the 'Save and New' button.

-
After selecting the 'Save' button above you will be returned to the 'Review Class' window where you will see the categories of information that you assigned to the class name (refer to below image). If you have finished adding class information to the class name you can now select the 'Close' button. If you haven’t finished you can also add additional categories, edit the listed categories or delete the listed categories by selecting the applicable buttons under the 'Class Information' heading.

-
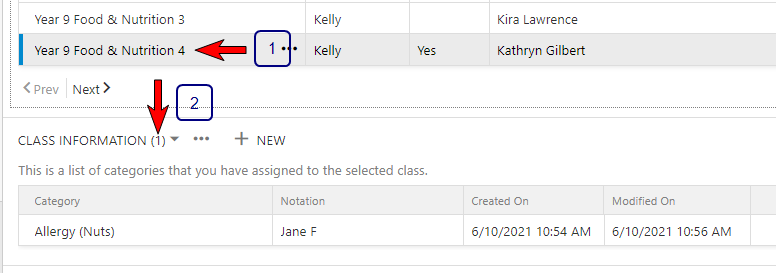
After selecting the 'Close' button you will be returned to your list of class names. If you select the class name that you just updated you will see the class information that you assigned to it (refer to the below image).
-
-
Select the 'Class Names' menu to display your list of class names

-
Locate the class name that you wish to assign additional information to and select its three dot ellipse (...) with your mouse pointer then select the 'Select' menu (refer to the below image).

-
This will open the 'Review Class' window (refer to the below image).
Before you add any class information ensure that 'Yes' has been selected for 'Allergies'. If it isn't then select the 'Edit' button, select 'Yes' for Allergies then select the 'Save' button. Doing this will also return you to your list of class names so re-select the class name by following point 2 above.
-
If 'Yes' has been recorded for 'Allergies' (refer to the below image) you can continue by selecting the 'New' button under the heading 'Class Information'

-
The 'New Class Information' window will open.

-
Select the 'Show Options' menu

-
Select the category that you wish to assign to the class name

-
Optional: if you wish to enter a notation for the category you are assigning then enter a notation (or leave it blank) then select the 'Save' button. If you wish to add additional categories to the class name select the 'Save and New' button and repeats steps 5 and 6 above. Once you have entered your last category name select the 'Save' button instead of the 'Save and New' button.

-
 Option 1 (At the Time of Creating a New Class Name)
To assign information to a class name at the time of creating the class name follow the below instructions:
-
Ensure that you have entered a class name, the teachers name and selected 'Yes' for Allergies (refer to the below image) then select the 'Save' button.

To view the above image select it with your mouse pointer. To close the image either click the image for a second time or click outside the image. -
The 'Review Class' window will open. Select the 'New' button under the 'Class Information' heading (refer to the below image). If you change your mind or want to do this at a later date select the 'Close' button.

To view the above image select it with your mouse pointer. To close the image either click the image for a second time or click outside the image. -
The 'New Class Information' window will open.

-
Select the 'Show Options' menu

-
Select the category that you wish to assign to the class name

-
Optional: if you wish to enter a notation for the category you are assigning then enter a notation (or leave it blank) then select the 'Save' button. If you wish to add additional categories to the class name select the 'Save and New' button and repeats steps 4 and 5 above. Once you have entered your last category name select the 'Save' button instead of the 'Save and New' button.

-
After selecting the 'Save' button above you will be returned to the 'Review Class' window where you will see the categories of information that you assigned to the class name (refer to below image). If you have finished adding class information to the class name you can now select the 'Close' button. If you haven’t finished you can also add additional categories, edit the listed categories or delete the listed categories by selecting the applicable buttons under the 'Class Information' heading.

-
After selecting the 'Close' button you will be returned to your list of class names. If you select the class name that you just updated you will see the class information that you assigned to it (refer to the below image).

-
Note: we only recommend using this option if you wish to add additional information categories to a class name that has existing information already recorded against it i.e. the class name already has 'Yes' selected for 'Allergies'. If you add class information to a class name which doesn't already have information recorded against it then you will have to go back and update the class name itself and change 'Allergies' to Yes. This can only be done through the class names area. As long as you remember to go back and update the class name you can use this option.
-
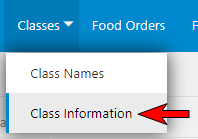
Select the 'Class Information' menu from the 'Classes' menu to display your list of class information (refer to below image).
-
This will open the 'Class Information' window (refer to below image).

-
Select the 'New' Menu

-
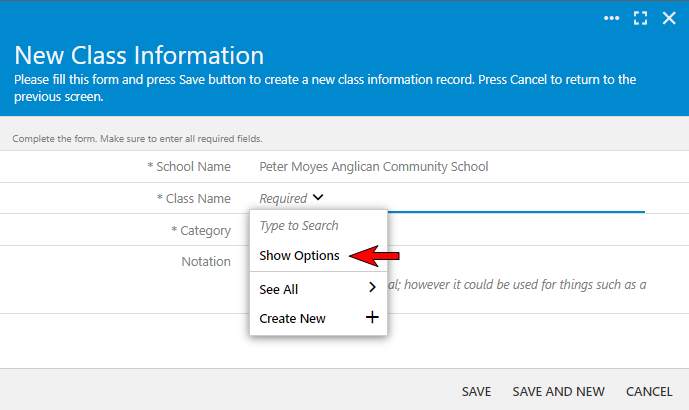
This will open the 'New Class Information' window. Select the menu named 'Show Options' (refer to below image).
-
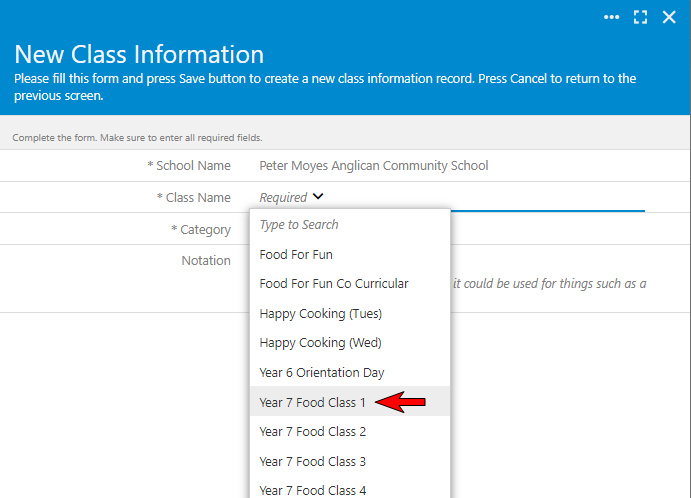
Locate and select the class name that you wish to add a class information category to (refer to below image).
-
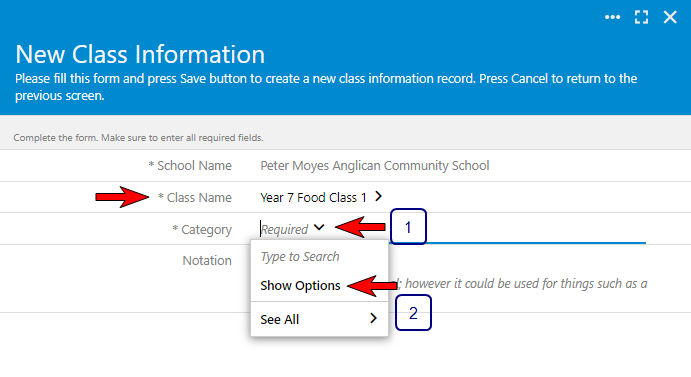
This will load the selected class name into the form (refer below image).
-
Select the field labelled 'Category'
-
Select the menu named ' Show Options'
-
-
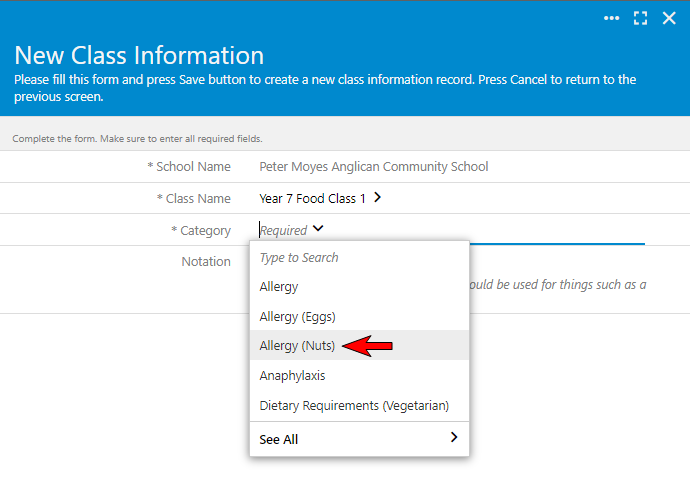
Select the category that you wish to assign to the selected class name (refer to below image).
-
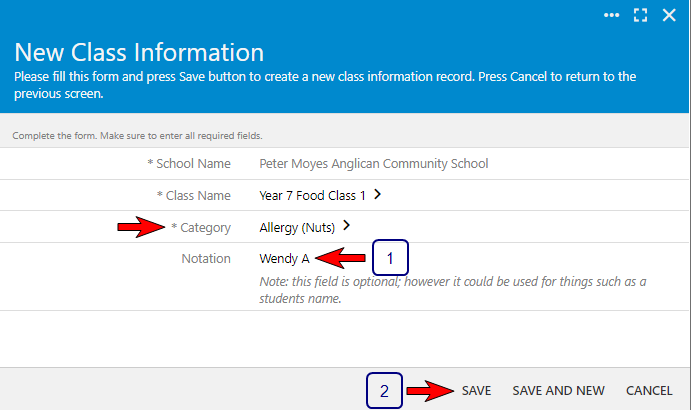
This will load the selected category into the form. The notation field is optional i.e. you don't have to enter anything in this field if you don't wish to. In the below example a students name has been entered.
-
Select the 'Save' button or if you have another one to enter select the 'Save and New' button.
-
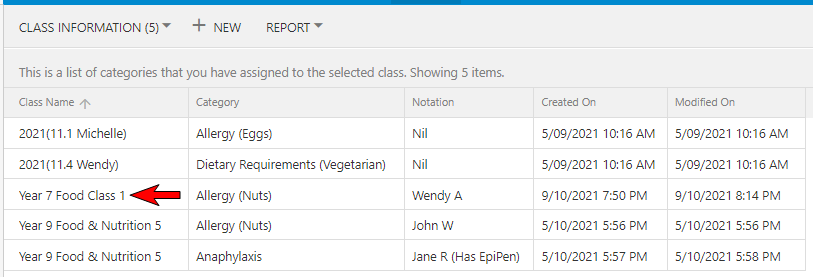
Once you select the 'Save' button you will be returned to your class information list where you will see the new entries that you have recorded (refer below image).
-
Check that the class name that you added this class information category to has 'Yes' selected for 'Allergies'. If it doesn’t, like in the below example, update the class name to reflect 'Yes' for 'Allergies (refer to below images).
