How to Add a Recipe
Once you have successfully signed into My Recipe Manager select the menu named 'Recipes' and follow the below instructions:
- Select the menu named 'New Recipe' (refer to the image below).

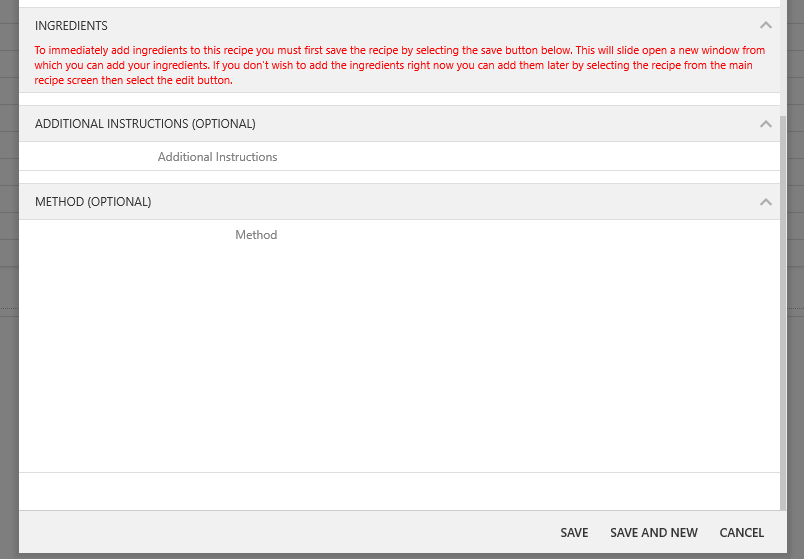
- The 'New Recipe' window will open (refer to the image below). To view the bottom of the form hover your mouse over the form and scroll downwards with your mouse.
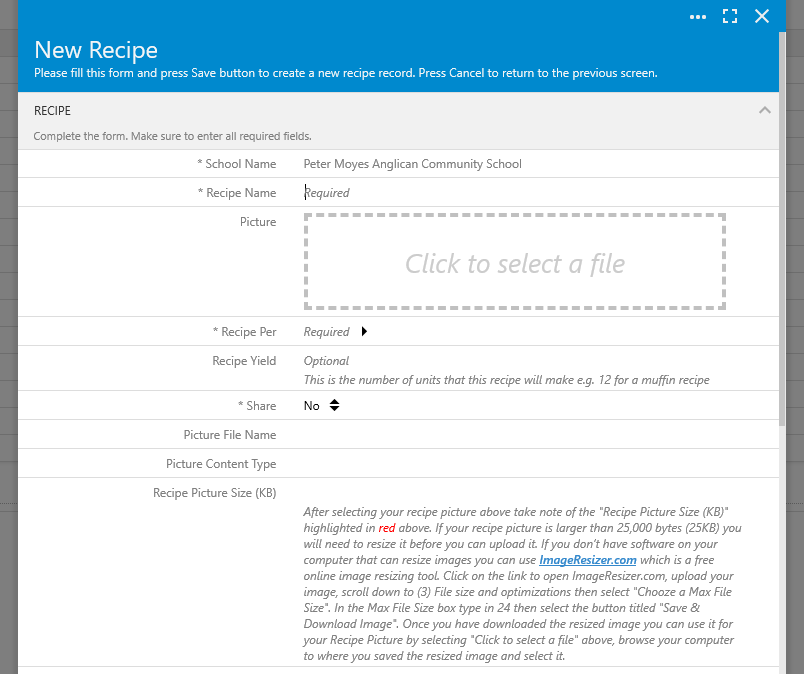
- School Name (automatic): this field is automatically filled in with your school name.
- Recipe Name (required): enter a name for your recipe.
Hint: think carefully about how you are going to name your recipes. Recipe names in My Recipe Manager display in alphabetical order. If you want all of your recipes to be grouped by class year you will need to prefix all of your recipe names with the year. This method allows you to quickly locate and browse recipes for a particular class year as they will be listed together. If you decide not to use the above method your recipe names will list in alphabetical order regardless of what class year they belong to (refer to below examples).
Alphabetical Examples (with preceding class year)
Year 7 Chocolate Cake
Year 8 Beef Burger
Year 8 Lemon Cheesecake
Year 10 Chocolate Muffins
Alphabetical Examples (with trailing class year)
Beef Burger Year 8
Chocolate Cake Year 7
Chocolate Muffins Year 10
Lemon Cheesecake Year 8
Alphabetical Examples (without class year)
Beef Burger
Chocolate Cake
Chocolate Muffins
Lemon Cheesecake
- Picture (optional): please refer to the topic 'How to Add a Recipe Picture' located in the list of topics (top right corner of this web page).
- Recipe Per (optional): make a selection from the available choices. Please refer to the topic 'What is Recipes Per?' located in the list of topics (top right corner of this web page).
- Recipe Yield (optional): this is the number of units that this recipe will make e.g. 12 for a muffin recipe.
- Share (required but is defaulted to No): this is defaulted to 'No'. If you want to share the recipe with other schools change this to 'Yes'. You can read more about sharing recipes by referring to the topic 'How to Share a Recipe' located in the list of topics (top right corner of this web page).
- Picture File Name (automatic: will complete if a picture is selected)
- Picture Content Type (automatic: will complete if a picture is selected)
- Recipe Picture Size (KB) (automatic: will complete if a picture is selected)
- Ingredients: you cannot add ingredients until you save the recipe, to add ingredients please refer to point 16 below.
- Additional Instructions (optional): if you have any instructions that you would like to appear on this recipe enter them here.
- Method (optional): enter the method for this recipe.
- Once you have completed all of the required fields select the 'Save' button or the 'Save and New' button if you wish to add another recipe name.
- If you selected the 'Save' button a recipe review screen will open to allow you to start adding ingredients to your newly created recipe. If you don't want to start adding ingredients to this recipe straight away simple select the 'Close' button and you will be returned to your list of recipe names.
Note: you can add ingredients to a recipe at any time i.e. you do not have to add them at the time of creating the recipe name.
- If you would like to start adding ingredients to the recipe name you just created then continue onto the next step.
- Place your mouse over the recipe review window that just opened and scroll down with your mouse until you locate the category titled 'Ingredients' (refer to the image below).
- Select the menu named '+ New'

- This will open the 'New Recipe Ingredients' window (refer to the image below). The cursor will be placed in the 'Ingredient Name' field and will be prompting you to select an ingredient.
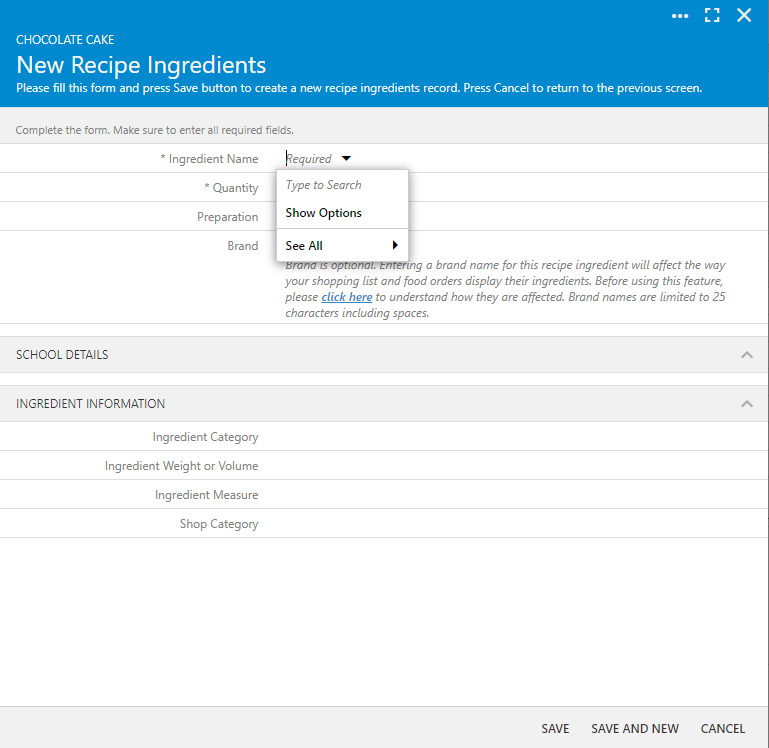
To select an ingredient you have three options. To view these options select them below.
With the cursor positioned in the ingredient name field start typing the name of your ingredient e.g. Flour. Any ingredient that contains the letters or word that you type will appear in the drop down list (refer below image). If the list of ingredients is lengthy use your mouse to scroll through the list until you locate the ingredient you are looking for. Once you locate the ingredient select it with your mouse pointer.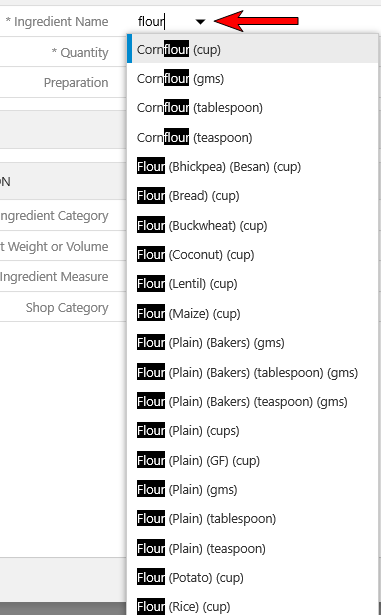
Hint: the more you type into the ingredient name field the shorter the list will become i.e. typing in the word flour will produce a much shorter list than typing in the letters 'flo'
Note: if you cannot find the ingredient you are looking for or the ingredient is listed but not with the required measure against it e.g. Tomato Sauce (mls) is listed but Tomato Sauce (teaspoon) is not listed then please refer to the topic "How to Request New Ingredients to be Added" .

Select the menu named 'Show Options'. This will list every available ingredient requiring you to scroll through the list until you locate the ingredient you are looking for. Once you locate the ingredient select it with your mouse pointer.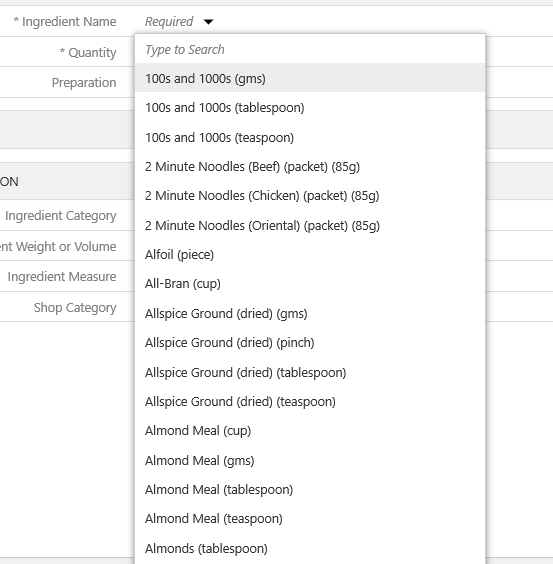
Select the menu named 'See All'. This will cause a new window to open which will display a list of all available ingredient names along with their shop category, weight or volume and their measure (refer to the image below). To locate the ingredient you are looking for you can either:
(1) hover you mouse pointer over the list and scroll downwards or
(2) select the search icon (small magnifying glass) which will open a search box. Type in a word to search on e.g. flour and press the enter key on your keyboard. The list of ingredients displayed in this window will be reduced to those containing the word you searched on.
Once you locate the ingredient select it with your mouse pointer.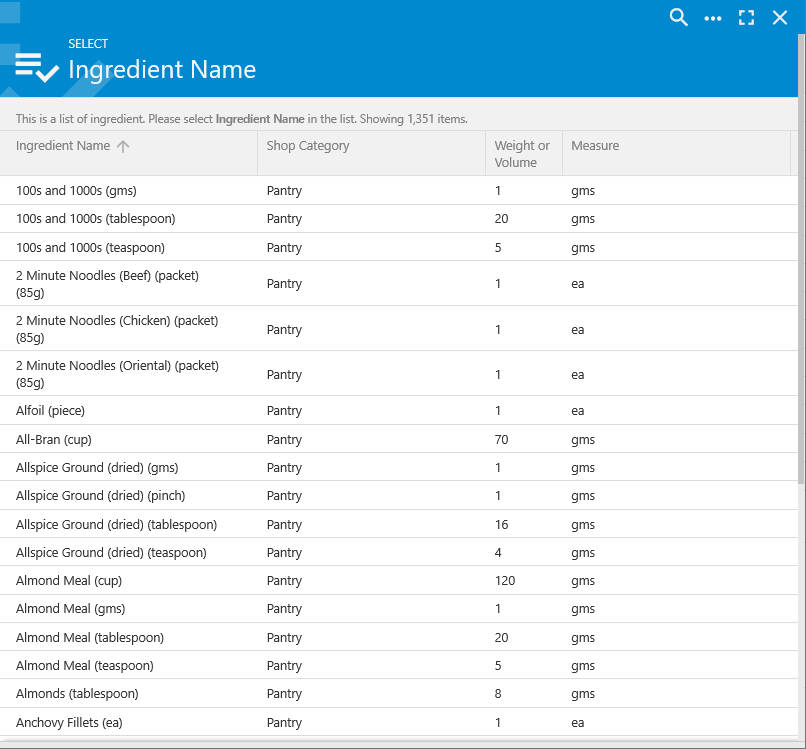
- Once you have selected an ingredient name the below four fields will automatically fill in (refer to the image below). In the case of 'Ingredient Category' this may be blank. To view what each of these four fields represent select them with your mouse pointer and their descriptions will appear underneath them.
 Ingredient Category
Where an ingredient is listed multiple times but with a different unit of measure against them e.g. gms, teaspoon, tablespoon or cup and they are all calculated in the same volume or weight e.g. gms then that ingredient will have an ingredient category assigned to it. This allows My Recipe Manager to group these ingredients on your food orders so that they only list once.
Example: if one recipe called for 2 tablespoons (40 gms) of flour, another recipe called for 1/2 cup (125 gms) of flour and another recipe called for 100 gms of flour and you were placing a food order for all three recipes, the food order would list a total of 265 gms of flour to purchase.
 Ingredient Weight or Volume
This is the weight or volume assigned to the selected ingredient.
For an ingredient with (gms) after it this will be 1 i.e. a single unit of weight.
For an ingredient with (mls) after it this will be 1 i.e. a single unit of volume.
For an ingredient with (teaspoon) after it this will be the value of a teaspoon in either gms or mls.
For an ingredient with (tablespoon) after it this will be the value of a tablespoon in either gms or mls.
For an ingredient with (cup) after it this will be the value of a cup in either gms or mls.
For an ingredient with (ea), (packet), (bunch) etc after it this will be a single unit of 1. Ingredient Measure
This is the measure that the ingredient is assigned to. There are three measures: gms, mls and ea.
 Shop Category
This is a category that the ingredient can be generally located in at the retail stores. It is also used to produce a shopping list (food order) which groups your ingredients into their respective shop category should you prefer to shop this way.
If you believe that the information in any of these four fields is incorrect please submit a support ticket to have them reviewed and/or corrected.
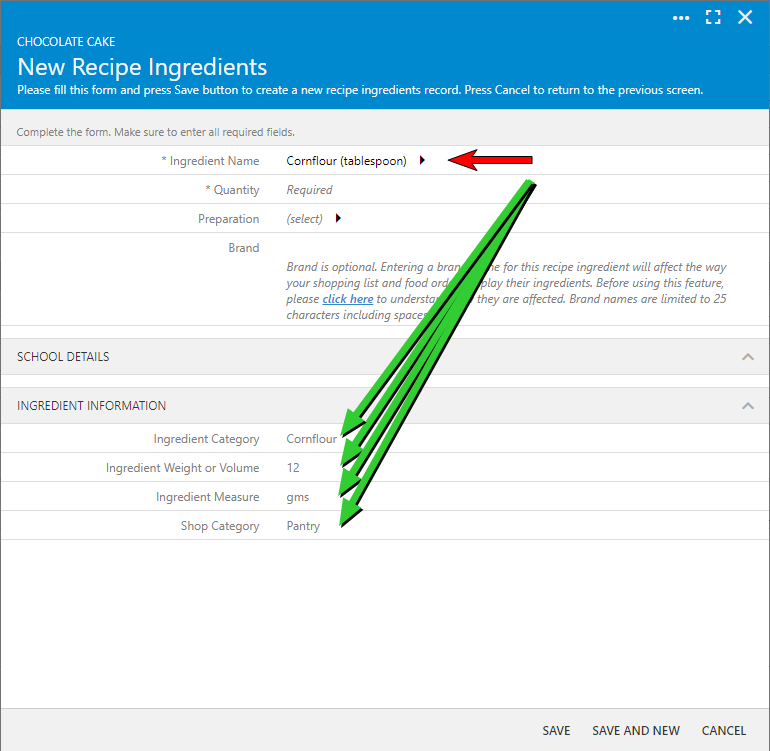
- Quantity (required): enter the quantity required based on the ingredient measure that you selected for that ingredient (refer to below examples).
Example: using cornflour as an example there are four different measures that you can select from:
Cornflour (gms): for quantity you would enter the number of gms required e.g. 15
Cornflour (teaspoon): for quantity you would enter the number of teaspoons required e.g. 2
Cornflour (tablespoon): for quantity you would enter the number of tablespoons required e.g. 3
Cornflour (cup): for quantity you would enter the number of cups required e.g. 1.5
The only exception to the above is where ingredients are labelled (ea), (packet), (bunch) etc. For these type of ingredients the quantity ordered would be based on that labelling.
Warning: quantity can only be entered in whole numbers or as a decimal e.g.
1/4 of a cup you would enter .25
1/3 of a cup you would enter .33
1/2 of a cup you would enter .5
2/3 of a cup you would enter .66
1 cup you would enter 1
1 1/3 cups you would enter 1.33
- Preparation (optional): where an ingredient needs to reflect how it should be prepared select its preparation type from the list of available preparations.
Example: two eggs being assigned to your recipe need to be beaten. In this case select "Beaten" from the list of preparations.
Note: to read more about preparations, how to use them, how to select them and how to request a new preparation to be added to My Recipe Manager etc please refer to the topic "Overview: Preparation".
- Brand (optional): when adding an ingredient to a recipe you can assign a 'brand' to that particular ingredient which then clearly indicates on the shopping list that a specific brand is to be purchased for that recipe ingredient. If that brand is not available to purchase you would need to consult with the teacher that requested it to see if another brand was suitable.
Warning: to read more about brands and how they affect your shopping list please refer to the topic "Overview: Brands".
You have finished adding an ingredient - you can now do one of two things:
- To add another ingredient to your recipe select the button named 'Save and New' and repeat the steps above to add the next ingredient. Continue to do so until you have added all the ingredient to your recipe selecting the button named 'Save' for the last ingredient that you add.
Note: you don't have to add all of the recipe ingredients if you don't want to. Ingredients can be added, updated and removed at any time as long as the recipe name has been created.
- If you don't wish to add any more ingredients then select the button named 'Save' and you will be returned to the main recipe screen.